


03 March 2022
|
An army a day keeps the wargaming doctor away, but also serves to get your miniatures to the table quicker
Words and Photos by Gerry Sutcliff.
Buy Miniature Wargames Magazine to See These Features First!
Most of us have hidden, in some curtained off corner, a plastic or lead mountain (or even both). Despairing of ever completing many of the projects I had started and added to that mountain; I nevertheless decided to complete a whole project in just one day and yes it did mean another addition to my range of mountains but it was a very short lived one.
This was prompted by demos I had seen of the siege of Portsmouth an English Civil War game in 2mm at a couple of shows. I remember previous magazine articles on such small scales: In praise of hair roller armies was one I recall; and another more recent piece had ancients made out of Milliput and then textured to look like irregular mobs.
Knowing that the final product would not take up much space; I started with a period I had not looked at before and completed a number of 2mm Crimean War armies. This was done on a mass production basis and was a large but rapid project made possible due to the scale of the figures. I already have a number of fine 28mm armies – including ECW – which I put together using the Army Painter ‘dip’ technique. With this experience – and the proposed use of such a small scale as 2mm – I was reasonably confident I could complete this task in one day. I ordered Union and Confederate armies for a modest sum from Irregular Miniatures and – a few days later – a package about the size of a large box of matches appeared. Here is a rundown of the process I used.
1) PREPARE YOUR FIGURES![]()

I timed myself in doing all this, starting with the Union Army. Being so tiny the odd element might drop to the floor, so – before you start – clear around you and try to work over a surface which will make them stand out. Irregular’s castings are pretty good when it comes to the small amount of flash, but they still need a little smoothing. You can do this by rubbing their bases on a piece of emery paper: one of those nails boards or even a metalwork grinder works fine (health and safety please). Time taken so far: 36 minutes.
If you have decided to finish up mounting your figures on fairly large bases (eg 60mm x 30mm) you might skip the next bit and mount them directly onto those which will save you some time at the “de-sprigging” stage. Using blue tack (or similar) in strips attach the figures to old DVDs. I put all the infantry (mostly) on one, the cavalry on another and everything else on a third. That’s another 40 minutes. Using a scalpel, trim both the ends of the elements and between the individual figures to remove any remaining flash. (20 minutes). Spray white primer on the Cavalry and Everything Else discs. Then spray blue colour primer on the Infantry disc. If you wish you can mask off and spray prime colour primer on the handful of infantry elements put on the Everything Else disc. These can be used for say Militia (grey colour primer) or Zouaves (blue colour primer then – when dry – add red trousers and kepi) or sharpshooters (dark green).
That’s another 5 minutes.
2) START GUNS & HORSES![]()

Once satisfied that all are dry (another 10 minutes) then – using a relatively fine brush – paint the bases grass green around the feet, hooves, cannons, limbers and so on (15 minutes). Paint the limbers, wagons and cannon in either matt natural wood or yellow ochre: it doesn’t matter too much which (5 minutes). Pick out the horses by painting them all matt white: they will stand out more and make the rest of their painting easier (5 minutes). Looking down on the horses; paint them white, black and brown basically in a downwards dot like fashion front and back. Next – swivelling the disc they are on – paint the front and rear in small horizontal strokes with, finally, a thrust between each horse from front to back. Do this until the purely white ones are just a scattered few on each element. I generally use Vallejo or Tamiya acrylics, but it doesn’t really matter as we are not being purists in any of this (30 minutes). At this point the mounted elements and artillery will look like a load of splodges: don’t panic as this will be cleared up later.
Give the limbers a second coat with matt natural wood or desert yellow then touch the cannon barrels and wheel edges gunmetal (8 minutes). As the horses have now had their first coat, go onto the humans: paint the skirmishers, artillerymen and then the riders with a dot of uniform blue on their front and back... If you want some of them as sharpshooters, use dark green instead of blue for those. For the cavalrymen and skirmishers this is easily done with a stroke from left to right and then right to left on each element. For the artillerymen, limber riders, skirmishers and mounted officers this is more of a small blob. (12 minutes). Painting the cavalry seems to be the main consumer of time as you are likely to have to return to them a few times for touching up.
3) WASH & SECOND COAT HORSE ![]()

The Cavalry and Everything Else disc elements could use a touch up in green on the base at this point. Do this to all elements in horizontal strokes across the base but not going over the foot of each miniature. At this point – seemingly miraculously – all of those naff splodges disappear, and the elements look more like military units (15 Minutes). Next put a thin black wash over the artillery and limbers, then to the lower half of the infantry figures and then return to the Cavalry and Everything Else discs and black wash under the horses, guns and limbers. (16 Minutes). Once dry, paint the horses again. White, black and brown but this time just quick horizontal strokes over the rump, main and horse front. (20 Minutes).
4) TOUCH-UPS
Due to the wash, you should be able to tell which are the front and the rear of the foot elements. You can reposition some, so they all face in the same direction which will make the touching up easier. Use a very light touch with burnt flesh to add faces to some figures. This is easiest on the infantry strips as a fine horizontal stroke along the top front of each element. You do not need to be perfect with this. For cavalry, artillery and skirmishers use just a tiny blob. Add the infantry packs in black or dark grey with a simple horizontal paint stroke. For muskets, use dark brown diagonal, bottom-to-top strokes or... don’t even bother (25 Minutes).

5) FLAGS
For all standards and guidons paint white and then it is a matter of choice. I tried for the Union flag by adding a thin red stripe at top and bottom then a tiny blue dot in the top corner nearest the flagpole. Another method is to group your figures together in regiments of several elements or companies in which case you can paint one element’s flag in the national colours then the remainder of the elements in a group colour. For example: the 6th Regiment have red, 5th yellow, 7th blue, 6th green and whatever else you want. For Union cavalry guidons I painted them white with a fine touch of yellow at the very top. For Confederate guidons I just painted them red (15 Minutes).
6) MAKING GOOD
Go over any figures which still need ‘making good’ due to any accidental overpainting. For example, mounted figures are likely to need a second uniform blue coat, headwear is bound to need a touch up to hide any superfluous flesh and the odd musket will have splodged and need covering up on the infantry jackets. Tidy up the infantry and artillerymen with uniform blue. Use thin front to back strokes which will change the stripe of flesh you could see on some overpainted elements into a series of dots. Add some black headwear here and there. Horses may need the odd touch in brown, white or black (25 Minutes).
7) FINISHING
Time to de-sprig, re-green and varnish. Carefully remove the elements on the DVD disks one type at a time and take off any Blu-tack still sticking to them (1 Hour). Yet again touch up the bases with a single stroke along each tiny base with intermediate green and put them to one side with gaps between them all (1 Hour). I then sprayed Army Painter Anti-Shine matt varnish over the whole army with a few thin passes from all four directions plus downwards and (after drying) it was job done! As the rest of my suggestions are a matter of choice this makes the total time taken just over 7 hours or one working day. Okay, you may want to add in more breaks and there are other things to try: next time I am going to consider using thin strips of double-sided tape rather than blue-tac or maybe even glue them straight onto bases instead of tacking them on disks. Or perhaps even forget adding the flesh...
8) BASING... OR NOT ![]()

Even though we have got to the ‘job done’ stage there are still questions about the 'what next': basing, rules, scenarios, army composition, terrain, playing aids. I do not intend to address all of these points in one go but there’s some obvious ramifications with basing: your choice of base size and composition is likely to be influenced by available rulesets or what level of unit you want the infantry elements to represent.
For example, Irregular Miniatures – who supplied the figures – also publish the Warring Empires rules. This lists base sizes as: Generals 10x10mm; Infantry 20x15mm; Skirmishers 20x10mm; Cavalry 20x15mm; Guns 15x15mm; Limber and wagon 10x20mm. However there are some 5mm and 6mm rules that could be pressed into use as an alternative. Polymos uses a standard 60x30mm base; a size which crops up in a number of scales and rules such as Armati, Fields of Glory and Dux Bellorum. for a different approach, when temporarily basing my Crimean War armies I used transparent Perspex in various sizes
Basing the elements individually at one to a base would suggest that the level of unit for each element would represent a battalion, regiment, brigade or even a division in its own right. That might end up with some pretty drawn out and complex battles. By “level of unit” I refer to the size of unit the infantry elements are meant to represent. Are they a company, regiment, brigade or division? Your choice of basing to meet this level would probably be influenced by the number of figures in an element and just how ‘realistic’ (in terms of numbers) you think a unit should look.
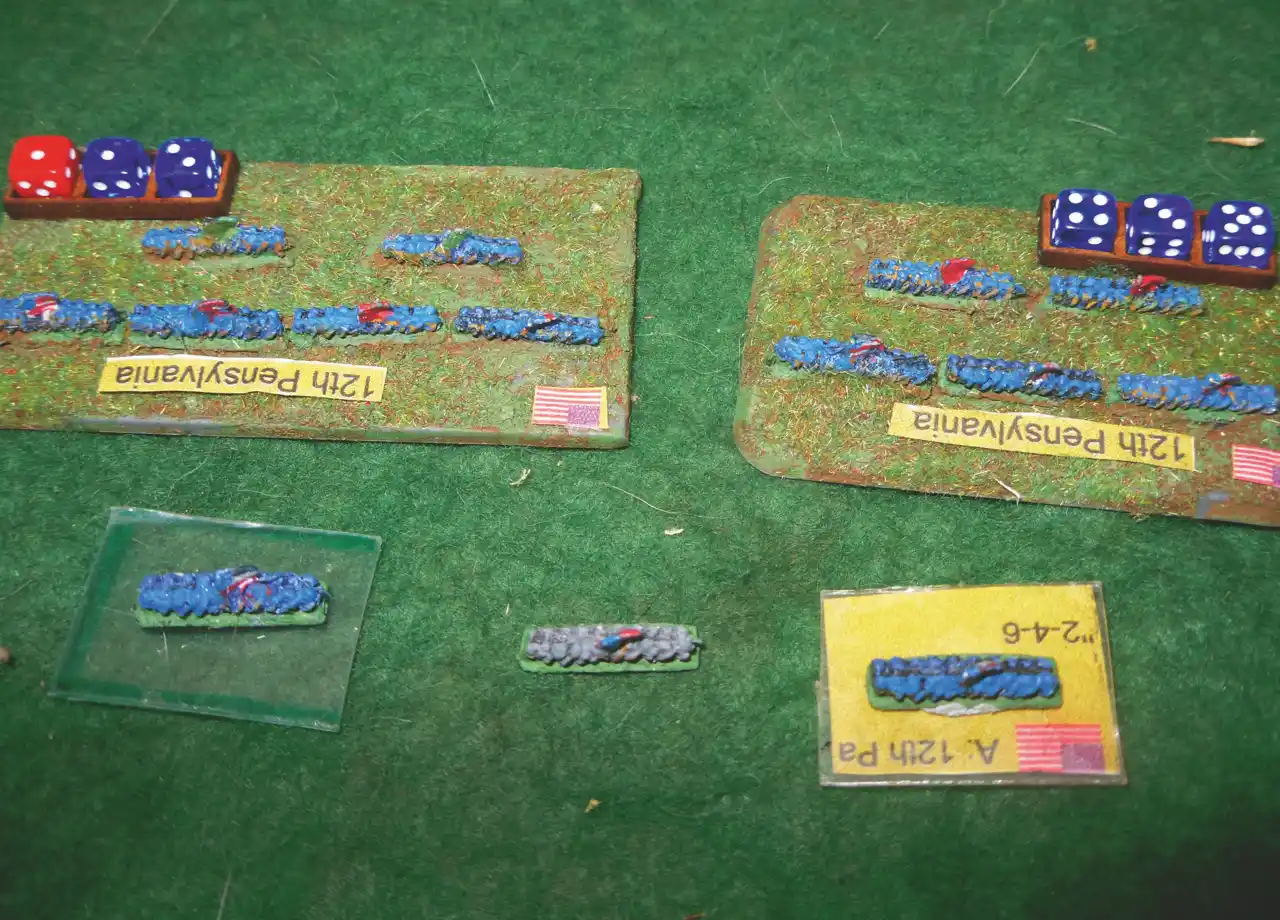
A different approach would be to group a number of elements together on one larger base: even then a number of such bases could be grouped together to form a brigade or division. I have seen square cards mounting two or four elements of infantry with plenty of room for an identifying label at front or rear. In the accompanying pictures you can see one example of a flocked base where a small enclosure has been added for the insertion of tiny dice or tokens which could represent various values such as firepower, combat, morale, movement. You could even add a tiny coloured bead which could represent the command to which the unit belongs, it’s fatigue or morale level or whatever. This base has been made out of plasticard.
This approach of putting a number of elements on one stand might help in making a game flow smoother and, at the same time, be more pleasing to the eye. I also quite like the idea of using standard Flames of War bases as they are 'plasticky', bevelled and have rounded corners. You can put a number of elements on their medium size (32 x 50mm) and so represent a decent sized regiment of several companies.
9) TERRAIN![]()

For terrain for a game in this scale there is just so much you can DIY it with. Existing two foot terrain boards you might own, fabric painted cloth or even maps can be pressed into service. Entire forests can be conjured out of fine lichen or rough wool, cut to shape. The small monopoly houses or sliced and shaped wooden dowel for buildings. Maybe wool or cord for walls and fences. Subjects for future articles no doubt!
10) CONCLUSIONS
So – as I’ve outlined – while you might have a fast army painted, you’ll need some gaming opposition. I've mentioned multiple basing solutions but you will need to find an opponent who not only has a compatible army but compatible bases as well. As a temporary measure you can still tack your elements onto clear Perspex bases and later rebase them to another chosen design. Although the sticky stuff has a habit of drying I do not know anyone who relishes having to rebase an army and there are other advantages of using this method such as printing off some fighting stats or using a playing counter (maybe from a board game) which you can tack on the underside of the base so it can show through. It is relatively simple thing to change the information or counters when needed for different battles.
There are great advantages in having a few armies in this scale. Low cost and the small amount of storage required are prime considerations. It would be so easy to have a collection of all the national armies of a particular campaign and still be able to put them in a bottom drawer. In this case, while painting the Union Army, I was also working on the Confederate opposition. I already have a number of ships for both sides in 1/1200. So: no need to worry if I can find an opponent with the right opposition army similarly based!
Wither from here? Napoleonic French, Russian, Austrian and British!
Looking for more?
This scenario was one of many that appears in Miniature Wargames Magazine, our monthly publication for all kinds of wargames! You can check out our latest issue, or previous issues by clicking here
Get your magazine hereHobby Tips: Gap Filling

Everything you need to know about gap filling using standard Magic Sculp, an epoxy putty that works and feels a little more like clay than the usual counterparts that are used.
Top Tips for the Hobbyist!
Join us in person
We can't wait for Tabletop Gaming Live 2022! An epic weekend in Manchester full of board games, card games, roleplaying games, wargames and more, with amazing exhibitors, great games, and an opportunity to game together in person.
See you there!Treat Yourself!
Have you visited our game store? We have everything from mystery boxes, to games and accessories – including the above Power Rangers: Heroes of the Grid, with a great discount! Head over to find your new favourite game.
Visit the Game Store
Sometimes we may include links to online retailers, from which we might receive a commission if you make a purchase. Affiliate links do not influence editorial coverage and will only be used when covering relevant products
Comments
Login or register to add a comment
No comments