


16 August 2019
|
 Hobby tips: converting Oathmark Dwarves
bigger, better, beardier
Words and Photography by Graham Green
In this article, rather than concentrating on the painting of figures, I want to go into more detail explaining how I convert them: I will show you three different levels of conversion work, from simple ‘enhancements’ through to extensive alteration.
The techniques I use are good for any period so hopefully this will be of some interest to people from most of the various factions within our hobby.
WHY OH WHY?
So why convert figures? There are hundreds if not thousands of different figures out there, though not all of them dwarves, I would accept. Speaking personally, I convert because - despite all of that choice – there never seem to be the ones that I see in my own head! Failing that, there are never enough figures in my favourite ranges to then finish the unit I am working on and so I either have to double up or use another make that never quite matches, and I really hate that! So, I started to change figures I had to more of how I wanted them, or convert ones in the same range to give me a matching unit of individuals: different in detail but stylistically compatible.
Nowadays we are blessed with multipart plastic figures and these have – at last – started to be as nicely detailed as the metal ones (and a lot cheaper too!). However, even with all of the optional bits and bobs of plastics there is still too much repetition for my fussy tastes: usually in a box you will get five or so torso’s and a number of heads, arms, weapons and shields, and so yes:you can get lots of flexibility of pose and position, but in the gaming world you might want to field a large army, and even those variations will inevitably run out.
Also, for me, one of the attractions of converting is the uniqueness of having figures that no one else has: that alone is worth the work.
KHAZÂD AI-MÊNU!
For this article, I will be using a box of Oathmark Dwarves from the range by North Star and Osprey.

In the box you get six identical sprues of figures, and each sprue has the usual five bodies plus a good selection of heads arms weapons etc. Straight out of the box they make lovely figures, but – as I said earlier – I always want some extra details and greater variation. In my last article on the Armies of Gondolin (issues 410 and 411 of Miniature Wargames) I alluded to making thirty dwarven figures out of the five basic ones on the sprue, so I wanted to outline how I’d done this. Although these are obviously plastic figures, the techniques involved are largely the same for metal ones, although the conversion work on plastic is rather easier.
Before I get into the actual chopping stuff about, I will mention the ‘tools of the trade’.

There are many different types of putty for sculpting work, but, I use both Greenstuff and Milliput. Both are two-part epoxy putties with different qualities: Greenstuff is the best for general sculpting as it is easier to work and stays workable for longer, but Milliput is better if you need to fill a joint and then need to file it smooth. Sometimes I will mix the two together for certain types of jobs that need a mix of the qualities of the more flexible Greenstuff and the rather harder Milliput.
For sculpting I have acquired a set of sculpting tools, available from many craft shops: I also use an old dentist’s pick that I came across many years ago, plus toothpicks are worth utilising as they can be very useful in tight spaces for fine detail. A small hand saw is essential and I use surgical scalpels and craft knives. Another useful addition is sculptor’s Vaseline, this helps to stop the very sticky Greenstuff from sticking to your fingers and tools, enabling a smoother finish. It is also worthwhile acquiring a box of spare parts and old figures to cannibalise! I have recently bought some Bluestuff: this is a thermoplastic that is perfect for making moulds of things like shields and heads that you need to reproduce if you plan on doing a large batch of figures. Lastly I have a pin vice and various small drill bits: again a very essential tool.
THE FIRST STEP
So, on with the work. This first section is dealing with very minor enhancement and conversions: the figures are essentially straight ‘out of the box’ but with a few ‘extras’ added.
The first five figures I built were archers: they were constructed with the standard parts but I wanted them reaching for arrows rather than firing, so I simply rotated their arms. For one figure I used a different left arm and removed the weapon.
The work I did on these was pretty simple stuff. First, I removed the bow from the ‘commander’ and put one stored with his quiver as I wanted him holding his shield. I then drilled a little into the different hand I used on one of them to make it look empty and – using Greenstuff – I filled out or lengthened their beards and hair. The commander had a bald head and I felt that it was a bit too distinctive so I gave him some Greenstuff hair (what’s Khuzdul for ‘comb-over’? Ed.).Lastly I added bowstrings made from stretched sprue: as these are plastic figures it made that finicky job a lot easier to do because the strings can be stuck onto the bows with liquid poly. That was it for the archers: just some quick easy additions that have given them a distinctiveness of their own.

SHIELDWALL
The second unit was again a fairly simple piece of work: the intention with these ten figures was to give an impression of a ‘shieldwall’ so they are all positioned so as to be holding their shields forward. Half of the unit has spears and the rest have various hand weapons.
Again, I rotated the standard arm that comes in the box and – for two of them – I used different arms: one figure was to be looking around and gesturing, whilst the other is thrusting his spear forward. For the gesturing one I used an raised arm and removed the original weapon; the thrusting one had a sword, which again was removed. Although the standard spears are nice, I just don’t trust plastic spears so I removed them and replaced them with steel ones (also available from North Star) and it’s an easy job to do: having chopped the spears off flush with the figures’ hands using a scalpel, I used the pin vice to drill through their hands and added the new spear. The other five figures with the hand weapons were all of standard construction.


The putty work on this unit was even simpler than the archers: all I did with these was enhance their beards and hair with more Greenstuff. When I’d finished, I had two small simple but distinctive units, using stock parts but with very simple additions giving them a look that is all their own.


THE AXES OF THE DWARVES!
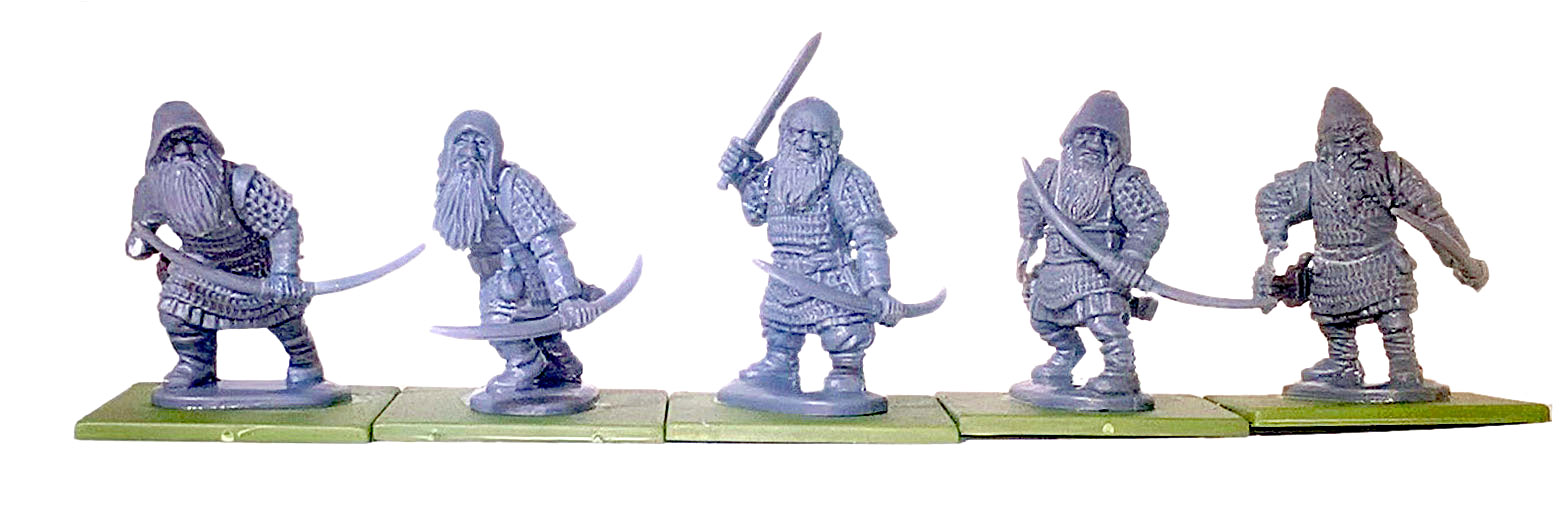
This second section is about performing some more complex additions: all the unit were to have cloaks, and I wanted some further arm differences.

Again the torso’s were straight out of the box but I wanted some new positions, as you can see in the accompanying picture, so I will go through these guys one at a time, left to right.
Figure 1:I rotated his head to the left so that he was standing sideways, I then used a stretched out archer arm and removed the bow and added his shield. I then gave him a raised sword arm, a beard improved with Greenstuff and a cloak added from the same material, both of which served to hide the joint the head rotation had made. This all went together and I think it gives him a nice, defiant stance, with his lowered shield, and it makes him a completely unique figure.
Figure 2: This one also had his head rotated, as was his axe arm, but the shield arm is standard. Once more his beard is worked on and he has a Greenstuff cloak, plus I also gave him a plume on his helmet. I think this produced a unique aggressive, advancing posture.
Figure 3:This one has his head on straight but I used the right archer arm so he looks like he is stroking his beard, the left arm originally held a hammer but I removed it and drilled his hand. I then used the shaft of a steel spear and fitted a large axe head to it. More Greenstuff went into his beard and a cloak was added.
Figure 4: I wanted a companion piece to the previous figure so I had him again standing in a relaxed pose with, his head slightly rotated. He has a spearman right arm with the spear removed and an axe added as per figure 3, I wanted his shield to be on his back so I removed the axe he had in his left hand and left it empty, I added the usual cloak and beard from Greenstuff.
Figure 5: this has yet another rotated head and weapon arm. Again I used the same left archer arm as figure number one but fixed the shield in a different position. A Greenstuff cloak and beard completed him.
And there they all are: unit number three! They are still pretty simple work-overs, but just slightly more complex than the ones in the first two groups: by rotating some parts you can get a marked difference into the figure, and – with more sculpting work – you can add yet more individuality.
At this point, a quick mention of cloaks is worth making: to do a tutorial on using Greenstuff to make cloaks would be an article in of itself, however there are many tutorials on how to do this on the internet. I strongly adviceyou to learn to master Greenstuff as it opens so many avenues, and its so easy to do.
STIFF NECKS OF THE DWARVES
Those were just some simple alterations and additions and with them we have taken the standard figures and created ones that are all our own. In this section let’s take this a step further, with torso alterations: yes, this section is about more extreme alteration, involving body cutting and leg transplants! By doing this we can alter the stance of a figure and even give it a feeling of movement or intent. There were to be ten figures in this unit so half the torsos were altered slightly with some leg swaps, while the other half – using the same five basic torsos – were cut in half.
Firstly the five non-bisected, standard torsos and, again, I will go through these from left to right.

Torso 1: he had his legs removed and swapped with Torso 2: they were pinned and the gap filled with Greenstuff.
Torso 2: with the legs from Torso 1, this figure’s whole stance was altered and it gave him a good running pose. The legs were attached in the same way as for Torso 1.
Torso 3: this guy had his right foot cut clear of the base and – with a little bending of the other leg – he was now stepping up onto a rock.
Torso 4: this one had the left leg parted from the base and was, again, bent so as to be stepping up. This time, however, I got a little over ambitious and the ankle that was bent cracked and needed filling with Greenstuff. This is something that has to be watched out for when bending limbs, even with plastics.
Torso 5: this one is standard,: I could do that in this unit because the other identical torso in the second batch was going to be cut.
So, some more complex work but still simple and the whole stance of most of the figures has been altered. However, the next picture shows the torsos, but these have all been cut with the razor saw. They were all sliced just above their belts, and – by rotating the top half by a few degrees – I ended up with a massive difference in stance: Figure 2 from this batch also had his left leg removed and some material was also pared away from behind his knee. This meant that the leg was rather more bent and raised, again giving him a running posture.

I added the arms and weapons in a similar way to how I have already described in the other sections, and gave them the usual beard treatment, so I won’t repeat all of that again. This unit were also intended to have face plates added to their helmets (very ‘First Age’! Ed.). This was achieved – yet again – with Greenstuff. While I had the putty out, I also had to fill the gaps caused by the cutting of the torsos and resculpt and repair the chain mail at the joint.

LAST STAND
Once painted I ended up with a very dark and aggressive unit, with some figures menacingly stepping over obstacles, and others running into the attack. And – in line with my stated objective – they are now completely different, individualistic models. There are thirty individual figures from those five basic torsos, and all of the techniques I have used are easy to learn and, once you go this route, there really is no limit to what you can achieve in almost any period.
As a last word, be very careful with knives, saws and drills! And go online and look at some tutorials on using Greenstuff: practice and gain confidence and then field your own personal creations! The only limit is your own imagination…

This article originally appeared in Miniature Wargames issue 423, July 2018.
Comments
Login or register to add a comment
No comments